Hermes Agent on Hostinger VPS: Complete Setup Guide
This guide stands Hermes up on its own, as an alternative to OpenClaw rather than a component inside it. If you already followed the OpenClaw Hostinger guide, almost everything here will feel familiar

Hermes Agent on Hostinger VPS: Complete Setup Guide
Version: 2026.06.02
Audience: Complete beginners comfortable with copy-paste, no prior VPS experience required
Estimated time: 60–90 minutes
Before You Begin
Hermes Agent is an open-source, MIT-licensed AI agent framework from Nous Research. Where OpenClaw is the multi-channel orchestration layer, the “Kubernetes of AI agents” routing messages across dozens of platforms, Hermes is the execution agent built around a single idea: a learning loop that gets sharper the longer you use it. It writes its own skills, keeps session memory, and improves on the categories of work you actually repeat.
This guide stands Hermes up on its own, as an alternative to OpenClaw rather than a component inside it. If you already followed the OpenClaw Hostinger guide, almost everything here will feel familiar: same VPS, same Tailscale-only access model, same security posture. The differences are the parts that matter: a different gateway, a different data layout, and OpenRouter as the LLM backend, so you can swap between Qwen, MiniMax, DeepSeek, Claude, and anything else OpenRouter fronts without touching your infrastructure.
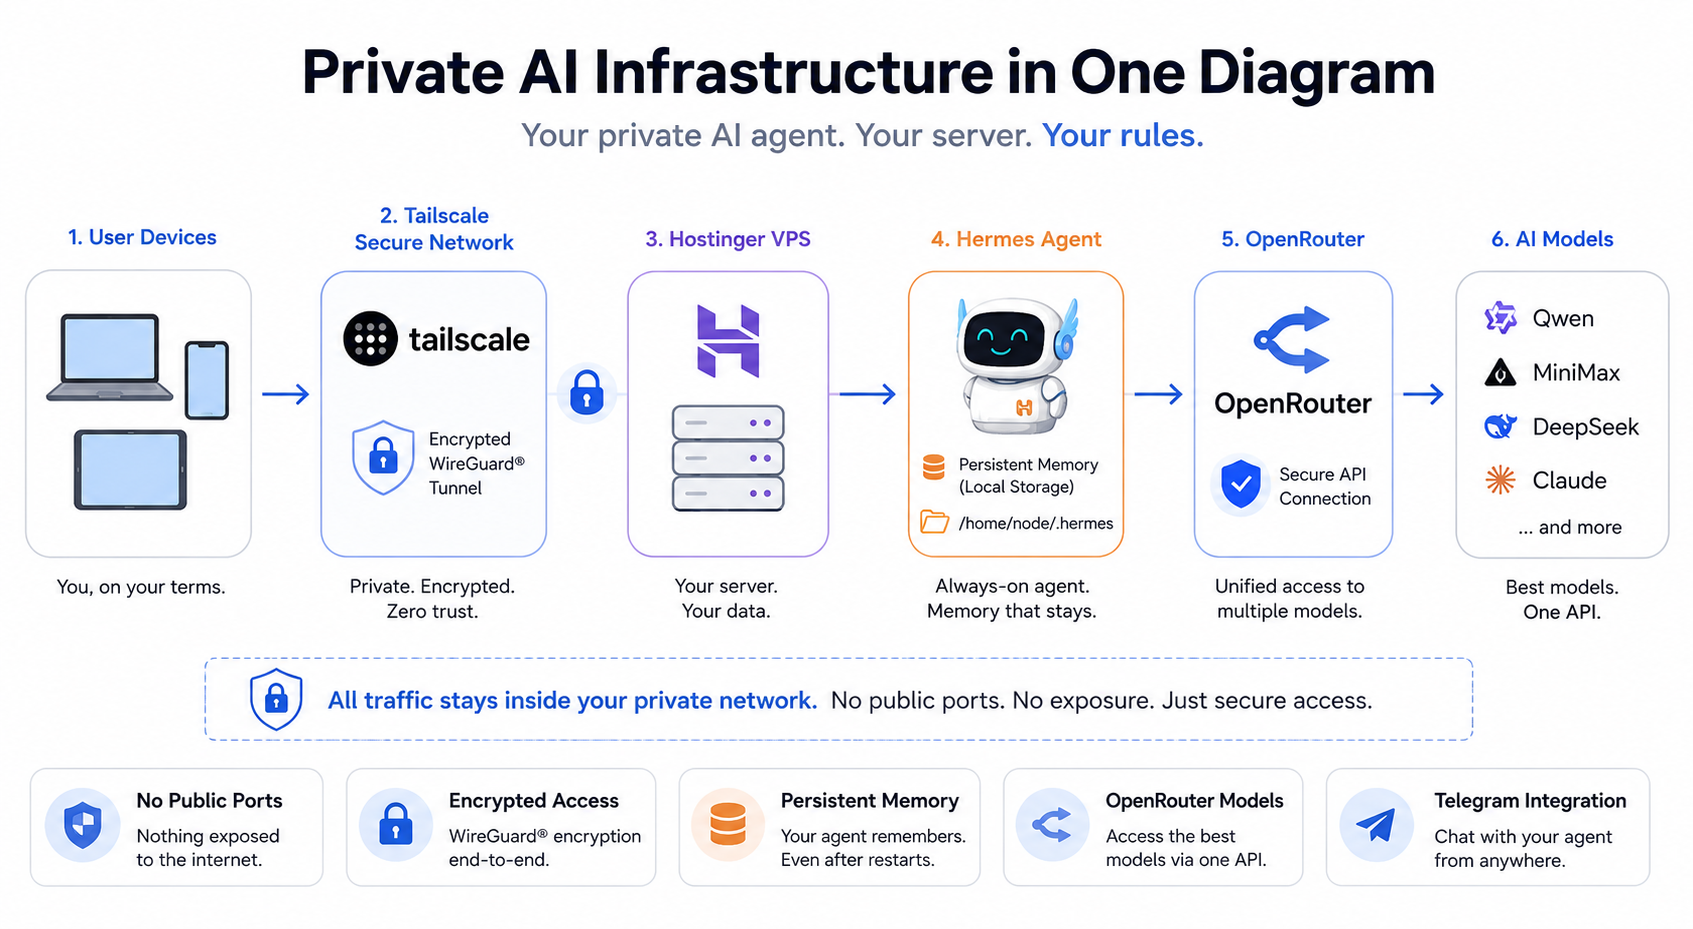
Architecture
Before touching any server, take two minutes to understand what you are building. Every step below will feel logical rather than arbitrary once you see the full picture.
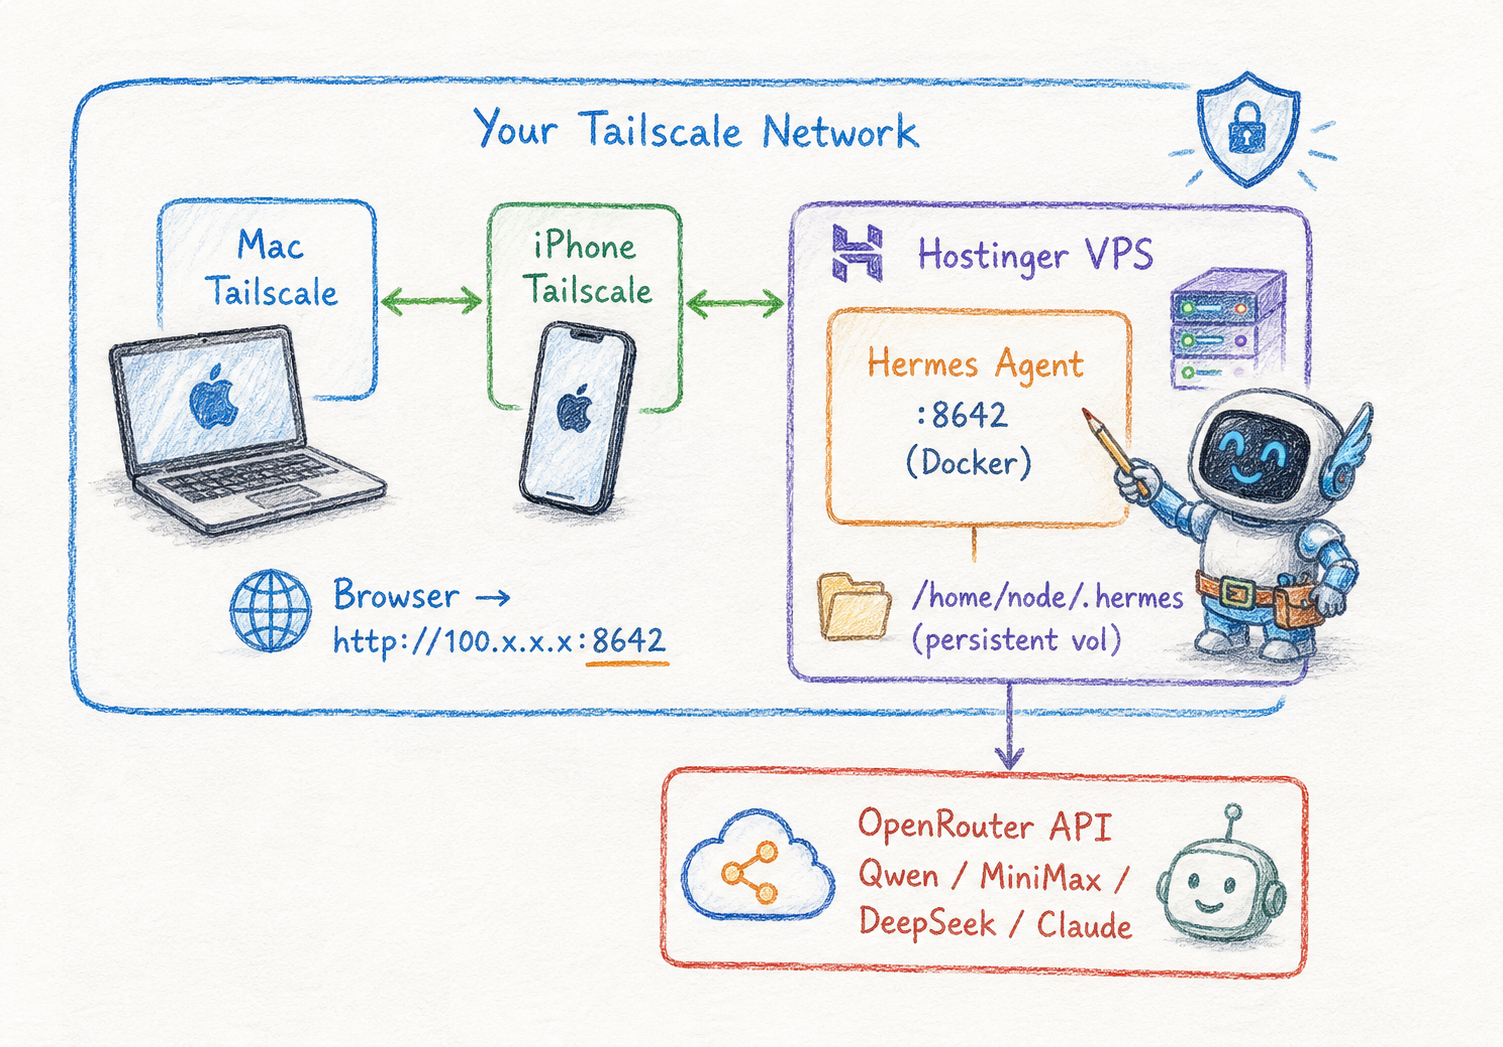
Key things to understand about this design:
- All access goes through Tailscale - both your terminal (SSH) and the Hermes web UI. No public ports are exposed. This is the same posture as the OpenClaw guide, and it sidesteps the Caddy/nginx + TLS reverse-proxy dance that public-facing Hermes setups require.
- The VPS has no open ports visible to the internet. An attacker who finds your IP address sees nothing.
- Tailscale uses WireGuard, a modern, audited, encrypted VPN protocol. Your traffic between devices is always encrypted.
- The gateway (port 8642) is only reachable inside your Tailscale network. You reach it from your Mac or phone by opening a browser to
http://YOUR_TAILSCALE_IP:8642. No tunnels, no forwarding. - The LLM lives off-box. Hermes itself is a gateway and orchestration layer; it does not run inference. OpenRouter handles the model calls, so you can pick the model based on your budget and task without provisioning a GPU.
Note: Hermes’ own documentation leans on a public reverse proxy with TLS for internet exposure. We deliberately do not do that. Tailscale gives us private, encrypted access with zero public attack surface, which is both simpler and more secure for a personal agent.
What this costs
| Item | Cost |
|---|---|
| Hostinger KVM 2 VPS | ~$9/month |
| Daily backups (optional, recommended) | $6/month |
| Tailscale | Free for personal use (up to 100 devices) |
| OpenRouter | Pay-as-you-go — load $10–20 in credit to start |
| Total baseline | ~$15–20/month + model usage |
OpenRouter is prepaid credit, not a subscription. You load a balance, and each model call draws it down at that model’s per-token rate. Cheaper open models (Qwen, DeepSeek, MiniMax) can run a moderate daily agent for a few dollars a month; routing everything through a frontier model costs more. You control that entirely by the model you select.
What you will have when you finish
- A hardened Hostinger VPS running Hermes Agent in Docker
- A Tailscale network linking your VPS to your Mac, phone, and other devices
- No open ports visible to the internet; all access is private and encrypted
- OpenRouter wired up as the LLM backend, with model selection between Qwen, MiniMax, DeepSeek, Claude, and more
- Telegram connected as a channel
- Fully persistent agent memory, skills, and credentials that survive restarts and upgrades
- An agent ready to use from any device, with its learning loop active
Prerequisites checklist
Before you start, create accounts at these services (all are free to create unless noted):
- [ ] Hostinger account - you will purchase a VPS (paid)
- [ ] OpenRouter account at openrouter.ai - for LLM access (prepaid credit, ~$10–20 to start)
- [ ] Telegram account - the mobile app works on iPhone and Android
- [ ] Tailscale account - free for personal use
Table of Contents
- Phase 1: Provision Your Hostinger VPS
- Phase 2: Install Tailscale (Before Anything Else)
- Phase 3: Harden the Server
- Phase 4: Set Up Persistent Data Storage
- Phase 5: Create Your Secrets File
- Phase 6: Set Up OpenRouter and Choose Your Model
- Phase 7: Configure Hermes
- Phase 8: Create Your Telegram Bot
- Phase 9: Configure docker-compose.yml for Persistence and Image Pinning
- Phase 10: Start the Gateway
- Phase 11: First-Run Setup
- Phase 12: Apply Security Hardening
- Phase 13: Connect Telegram
- Phase 14: Set Behavioral and Financial Guardrails
- Appendix A: Updating Hermes
- Appendix B: Log Management
- Appendix C: Emergency Recovery (Hostinger Browser Console)
- Appendix D: Quick Reference Cheat Sheet
- Appendix E: Common Problems
- Appendix F: Now What?
Phase 1: Provision Your Hostinger VPS
What is a VPS and why use one?
A VPS (Virtual Private Server) is a computer in a datacenter that runs 24 hours a day, 7 days a week. You rent it by the month. Unlike running Hermes on your laptop, a VPS:
- Is always on your agent, keeps working while you sleep
- Isolated from your personal file,s a misconfiguration cannot touch your home directory
- Has a predictable, stable environment, no software conflicts with your other apps
- Has a static IP address, Tailscale can always find it
Step 1.1 - Choose your plan
Navigate to Hostinger’s VPS plans. The recommended baseline is the KVM 2 plan:
| Spec | KVM 1 (minimum) | KVM 2 (recommended) |
|---|---|---|
| vCPU | 1 | 2 |
| RAM | 4 GB | 8 GB |
| NVMe storage | 50 GB | 100 GB |
| Monthly cost | ~$5 | ~$9 |
Why specs matter: Hermes runs continuously, maintains session memory with vector embeddings, handles Telegram messages, and makes API calls. Because inference happens off-box at OpenRouter, Hermes is lighter on the VPS than a local-model setup would be, but its memory subsystem and learning loop still have headroom. A KVM 1 will run a light personal agent; KVM 2 is the comfortable choice if you intend to use it daily.
Step 1.2 - Select your operating system
Choose Ubuntu 22.04 LTS or Ubuntu 24.04 LTS.
LTS stands for Long Term Support. Ubuntu releases an LTS version every two years and supports it with security patches for five years. For a server you plan to run for a year or more, LTS is the right choice.
Step 1.3 - Handle the “Ready to Use AI” toggle
During checkout, Hostinger may present a “Ready to Use AI” toggle. This is a billing and provider choice, not a security setting.
- If you leave it on, Hostinger bundles AI credits via its own provider. You pay through Hostinger and have less control over model selection.
- If you deselect it, you supply your own OpenRouter key. You have full control to choose any OpenRouter front model, set your own spending limits, and pay OpenRouter directly.
Deselect it. This guide wires up OpenRouter directly.
Step 1.4 - Add daily backups
Hostinger includes weekly backups free in the base plan. Daily backups cost $6/month and can be added during checkout or later via hPanel.
Daily backups are worth it. Hermes’ learning loop means its memory and self-generated skills accumulate real value over time; losing them is not a clean reset, it is losing weeks of accumulated context. A daily backup is a powerful undo button.
Step 1.5 - Complete checkout and note your server details
After purchase, Hostinger sends you an email with:
- Your VPS IP address
- Your root password
The root account is the most powerful account on a Linux server. It has complete, unrestricted control. You will use it exactly once, in Phase 2, to set up Tailscale. After that, it gets locked down.
Log into hPanel and navigate to your VPS dashboard. Keep this tab open.
Step 1.6 - Bookmark the emergency browser console
Before doing anything else: in hPanel, find your VPS and locate the Console option (sometimes labeled Emergency Console or VNC). This opens a terminal in your browser, connecting to your server through the data center’s internal network, completely bypassing all network configuration.
Bookmark this page now. If anything in Phase 2 or Phase 3 breaks your network connectivity, this console is your way back in.
Note: The browser console is your emergency escape hatch. Bookmark it before you need it, not after.
Phase 2: Install Tailscale (Before Anything Else)
What: Installing Tailscale on your VPS.
Why: Tailscale creates a private, encrypted network between your devices. Once installed, your VPS has no open ports visible to the internet — not for SSH, not for the Hermes web UI. Everything goes through Tailscale’s encrypted WireGuard tunnel. After Phase 2 is complete, you will never need your VPS’s public IP address again.
Step 2.1 - First login (one time only)
This is the only time you will use the root password and the public IP from Hostinger’s email.
# Run on your LOCAL machine
ssh root@YOUR_VPS_IP
Enter the root password from Hostinger’s email when prompted.
Step 2.2 - Install Tailscale on the VPS
Tailscale provides a one-line installer that detects your OS and installs the correct package automatically:
Security note: curl | sh — This command downloads a shell script and runs it immediately. The risk: if Tailscale’s CDN were compromised, you could execute malicious code as root. Why we use it anyway: Tailscale’s install script is open source, maintained by a well-funded security-focused company, and this is their official documented install method. If you prefer to verify first, download the script, inspect it, then run it.
# Run on your VPS
curl -fsSL <https://tailscale.com/install.sh> | sh
Step 2.3 - Enable Tailscale SSH and connect to your network
Tailscale SSH handles authentication through your Tailscale account no key files to copy, no authorized_keys to manage.
# Run on your VPS
sudo tailscale up --ssh
This command outputs a URL. Open it in your browser and log in to your Tailscale account to authorize the VPS as a device on your network.
Step 2.4 - Note your Tailscale IP
# Run on your VPS
tailscale ip -4
This returns an IP that looks like 100.x.x.x. This is your VPS’s address inside the Tailscale network. Save this IP - from this point on, you use this address to reach your VPS, not the public IP from Hostinger.
Step 2.5 - Install Tailscale on your other devices
Every device that needs to reach Hermes, your Mac, your iPhone, your iPad, needs Tailscale installed and signed in to the same account as your VPS.
- Mac: Download from tailscale.com or the Mac App Store. Sign in.
- iPhone/Android: Install the Tailscale app. Sign in with the same account.
Once connected, all devices appear in your Tailscale admin console at login.tailscale.com. Confirm your VPS shows as Connected.
Step 2.6 - Test Tailscale SSH from your local machine
Open a new terminal window on your local machine (keep the root session open for now):
# Run on your LOCAL machine — new terminal window
ssh root@YOUR_TAILSCALE_IP
This should connect without prompting for a password.
Warning: Do not proceed until this works. If Tailscale SSH does not connect, check that both your local machine and your VPS appear as Connected in your Tailscale admin console. If the VPS shows offline, re-run Step 2.3.

Phase 3: Harden the Server
What: Creating a non-root user and locking down the server’s network exposure.
Why: Root has unlimited power — a single mistyped command can delete the entire OS. A non-root user withsudocan do everything you need, but mistakes and compromised processes are contained. We also configure the firewall to allow only Tailscale traffic.
Step 3.1 - Create a non-root user
# Run on your VPS
adduser YOUR_USERNAME
usermod -aG sudo YOUR_USERNAME
adduser that asks for a password and some optional profile fields. Set a password; skip the profile fields by pressing Enter.
Step 3.2 - Verify Tailscale SSH works for the new user
Warning: Do this in a new terminal window before logging out of your root session. If the new user cannot connect, fix it before closing root — otherwise you lock yourself out.
# Run on your LOCAL machine — new terminal window
ssh YOUR_USERNAME@YOUR_TAILSCALE_IP
You should connect without being prompted for a password. If it fails, confirm the username and re-run Step 3.1. If it still fails, use the Hostinger browser console.
Step 3.3 - Configure the firewall
Critical preflight check — read before running any UFW command: The rules below deny ALL incoming connections except traffic on the Tailscale interface (tailscale0). If you are currently connected over a regular public-IP SSH session (not via Tailscale), runningsudo ufw enablewill lock you out immediately. Confirm you are on Tailscale first by runningtailscale ip -4and checking your connection uses the100.xaddress. If you do get locked out: use the Hostinger browser console and runsudo ufw disable.
The strategy: default to deny all incoming traffic, then allow only Tailscale. The public internet cannot reach any service on your VPS.
# Run on your VPS
sudo ufw default deny incoming
sudo ufw default allow outgoing
sudo ufw allow in on tailscale0
sudo ufw enable
Verify:
# Run on your VPS
sudo ufw status verbose
You should see default deny (incoming), default allow (outgoing), and tailscale0 ALLOW IN Anywhere.
Note: Port 22 (SSH) and port 8642 (Hermes) are not listed separately that is correct. They are blocked from the public internet by the default deny rule. Access to both goes through the already-allowed Tailscale interface.
Step 3.4 - Disable root login
# Run on your VPS
sudo cp /etc/ssh/sshd_config /etc/ssh/sshd_config.bak
sudo nano /etc/ssh/sshd_config
Find and set these two lines (add them if they do not exist):
PermitRootLogin no
PasswordAuthentication no
Save (Ctrl+O, Enter, Ctrl+X) then restart SSH:
# Run on your VPS
sudo systemctl restart sshd
From this point forward, all your connections use YOUR_USERNAME@YOUR_TAILSCALE_IP.
Step 3.5 - Install Docker
Hermes ships as a Docker image, so install Docker now if it is not already present:
# Run on your VPS
curl -fsSL <https://get.docker.com> | sh
sudo usermod -aG docker YOUR_USERNAME
Log out and back in (exit, then SSH in again) so the docker group membership takes effect. Verify:
# Run on your VPS
docker --version
docker compose version
Phase 4: Set Up Persistent Data Storage
What: Creating a directory on the VPS that holds all of Hermes’ data.
Why: Docker containers are ephemeral everything written inside is erased when the container stops or upgrades. Hermes stores everything stateful under a single directory inside the container (/home/node/.hermes): config, credentials, memory, and logs. By mounting a VPS directory there, the data lives on disk rather than inside the container. Restarts and upgrades leave your agent’s memory, skills, and channel pairings completely intact.
Think of it this way: the container is a rental car. When you return it, everything in the glove box is gone. Keep your wallet in your own pocket (the VPS directory), and it is always with you, regardless of which car you rent.
Note: This is a structural difference from OpenClaw. OpenClaw split data, logs, and config into separate directories. Hermes consolidates everything under one /home/node/.hermes tree, so we mount a single host directory.Step 4.1 - Create the directory structure
# Run on your VPS
sudo mkdir -p /opt/hermes/data
sudo mkdir -p /etc/hermes
What each directory is for:
/opt/hermes/data- mounted to/home/node/.hermesinside the container. Holdsconfig.yaml,credentials/(Telegram and other channel pairings),memory/(session memory embeddings), andlogs/(internal audit logs). Losing this means re-pairing every channel and losing accumulated memory./etc/hermes- the secrets directory. The.envThe file with your auth token and OpenRouter key lives here, separate from the data.
Step 4.2 - Set permissions that the container can use
What: Setting correct ownership on the data directory.
Why: The Hermes container runs its process as thenodeuser (UID 1000 in the official image), not root. If the directory is owned by the wrong user, the container silently fails to write and you lose memory on every restart.
The official Hermes image runs as the node user, which is UID 1000:
# Run on your VPS
sudo chown -R 1000:1000 /opt/hermes/data
sudo chmod -R 755 /opt/hermes/data
sudo chown YOUR_USERNAME:YOUR_USERNAME /etc/hermes
sudo chmod 700 /etc/hermes
Note: You can confirm the exact UID after pulling the image withdocker inspect ghcr.io/nousresearch/hermes-agent:latest --format '{{.Config.User}}'. If it reports something other thannodeor1000, re-apply thechownwith the reported UID. You will know permissions are correct in Phase 11 - if files appear in/opt/hermes/data/after first-run setup, you are good. If the directory stays empty, the container lacks write access; return here.
Phase 5: Create Your Secrets File
What: Storing your auth token and OpenRouter key in a protected file, not in the main config.
Why: These are passwords. If your OpenRouter key leaks, someone can burn your credit. If your gateway auth token leaks, someone can command your agent. A dedicated secrets file with restricted permissions means they are never accidentally included in a config backup or pasted into a forum post.
Step 5.1 - Generate a gateway auth token
Unlike OpenClaw’s auto-generated Gateway Token, you set the Hermes auth token yourself. Generate a strong random one:
# Run on your VPS
openssl rand -hex 32
Copy the output. This is your HERMES_AUTH_TOKEN - Store it in your password manager.
Step 5.2 - Create the secrets file
# Run on your VPS
sudo nano /etc/hermes/.env
Add these lines (you will fill in the OpenRouter key in Phase 6):
HERMES_AUTH_TOKEN=PASTE_YOUR_GENERATED_TOKEN_HERE
OPENROUTER_API_KEY=FILL_IN_LATER
Save (Ctrl+O, Enter, Ctrl+X).
Step 5.3 - Lock down permissions
# Run on your VPS
sudo chmod 600 /etc/hermes/.env
sudo chown YOUR_USERNAME:YOUR_USERNAME /etc/hermes/.env
chmod 600 means only your user can read or write this file.
Phase 6: Set Up OpenRouter and Choose Your Model
Why OpenRouter
OpenRouter is a single API that fronts hundreds of models from many providers, Qwen, MiniMax, DeepSeek, Anthropic’s Claude, OpenAI’s GPT, Google’s Gemini, and more behind a single OpenAI-compatible endpoint and a single API key. For Hermes, this is the flexibility play: you change models by editing one line, never your infrastructure. Want to run cheap-and-fast for routine tasks and switch to a frontier model for hard reasoning? One key, one config change.
Step 6.1 - Create an account and load credit
- Go to openrouter.ai and create an account.
- Go to Settings → Credits and load a starting balance ($10–20 is plenty to learn your usage).
- OpenRouter is a prepaid calling service that draws down your balance at each model’s per-token rate. Set up a low-balance email alert so you are not surprised.
Step 6.2 - Create a scoped API key
Warning: Create a dedicated key for this VPS. If the VPS is ever compromised, you revoke that one key and your account stays safe.
- Go to openrouter.ai/keys → Create Key
- Name it
hermes-hostinger-vps - Set a credit limit on the key (e.g., $20) as a hard ceiling on what this key can spend, belt-and-suspenders alongside your account balance.
- Copy the key immediately. It looks like
sk-or-v1-.... Store it in your password manager.
Step 6.3 - Add it to the secrets file
# Run on your VPS
sudo nano /etc/hermes/.env
Replace FILL_IN_LATER on the OPENROUTER_API_KEY line with your actual key. Save.
Step 6.4 - Choose your model
OpenRouter identifies models with a vendor/model slug. You set this in config.yaml in the next phase. A few starting points:
| Use case | Example model family | Notes |
|---|---|---|
| Cheap, fast, capable workhorse | Qwen (latest instruct) | Strong general agent at low cost |
| Long-context / agentic tasks | MiniMax | Large context windows |
| Budget reasoning | DeepSeek | Good price-to-reasoning ratio |
| Maximum quality | Claude (frontier tier) | Highest cost per token; reserve for hard tasks |
Warning: Model slugs change as vendors ship new versions. Do not trust a hardcoded slug from any guide — including this one. Go to openrouter.ai/models, find the model you want, and copy its exact current slug (e.g.qwen/qwen3.5-...,minimax/minimax-...,deepseek/deepseek-...). The format is alwaysvendor/model. Paste the verified slug intoconfig.yamlin Phase 7.
Note: Hermes uses a separate embedding model for its memory subsystem (Qwen3 embeddings by default). That is independent of your chat model choice and generally needs no configuration to get started.
Phase 7: Configure Hermes
Step 7.1 - Create config.yaml
Hermes reads its runtime configuration from config.yaml inside the data directory. YAML uses indentation for hierarchy. Two rules: always use spaces (never tabs), and be consistent with how many spaces per indent level. A single tab breaks YAML silently.
# Run on your VPS
sudo nano /opt/hermes/data/config.yaml
Enter the following. Note that the API key and auth token are not here — they come from the .env file at startup:
llm:
provider: openrouter
  # Paste the exact slug you copied from openrouter.ai/models
model:"qwen/qwen3.5-72b-instruct"

gateway:
bindAddress:"YOUR_TAILSCALE_IP:8642"

channels:
telegram:
enabled:true
dmPolicy:"pairing"

security:
approvalRequired:
- shell_exec
- file_write
Replace YOUR_TAILSCALE_IP with your actual Tailscale IP from Phase 2 and the verified model slug from Phase 6.
What each section does:
llm: tells Hermes to route through OpenRouter and which model to use. The key comes from.env— it never appears here.gateway.bindAddress: locks the web UI to your Tailscale IP only. Nothing listens on port 8642 on the public interface.channels.telegram: enables Telegram withdmPolicy: "pairing", so only paired accounts can command the bot. Strangers who find your bot get no response.security.approvalRequired: Hermes will pause and ask for your confirmation before running shell commands or writing files. More on Hermes’ security model in Phase 12.
Save (Ctrl+O, Enter, Ctrl+X).
Note: Hermes’ first-run web UI (Phase 11) can also write much of this config for you interactively. Creating config.yaml by hand first gives you a known-good baseline and makes the bind address explicit before anything starts listening. If the web UI later rewrites fields, that is expected.Phase 8: Create Your Telegram Bot
BotFather is Telegram’s official bot for creating and managing other bots.
Step 8.1 - Create a bot
- Open Telegram and search for
@BotFather - Start a conversation and send
/newbot - Give it a display name (e.g.
My Hermes Agent) — shown in chat headers - Give it a username — must end in
bot(e.g.myhermes_bot) — unique across all of Telegram
BotFather replies with a token like 1234567890:ABCdefGHIjklMNOpqrsTUVwxyz. Copy it.
Step 8.2 - Add it to the secrets file
# Run on your VPS
sudo nano /etc/hermes/.env
Add the Telegram token as a third line. Your .env should now look like this (with real values):
HERMES_AUTH_TOKEN=a1b2c3...your-32-byte-token
OPENROUTER_API_KEY=sk-or-v1-...
TELEGRAM_BOT_TOKEN=1234567890:ABCdef...
Save.
Phase 9: Configure docker-compose.yml for Persistence and Image Pinning
What: Writing the Docker Compose file that mounts your data directory, loads secrets, binds the port to Tailscale, and pins the image version.
Why: Without the volume mount, all agent data is erased on every restart. Without a pinned image, an automatic pull oflatestcould silently change behaviour or break a working setup. Pinned versions mean you choose when to update.
Step 9.1 - Create the compose file
# Run on your VPS
sudo mkdir -p /opt/hermes
sudo nano /opt/hermes/docker-compose.yml
Enter the following:
services:
hermes:
image: ghcr.io/nousresearch/hermes-agent:0.10.0
container_name: hermes-agent
restart: unless-stopped
env_file:
- /etc/hermes/.env
volumes:
- /opt/hermes/data:/home/node/.hermes
ports:
-"YOUR_TAILSCALE_IP:8642:8642"
healthcheck:
test:["CMD","wget","-qO-","<http://localhost:8642/health>"]
interval: 30s
timeout: 10s
retries:3
start_period: 20s
logging:
driver:"json-file"
options:
max-size:"10m"
max-file:"3"
Replace YOUR_TAILSCALE_IP with your actual Tailscale IP.
What each part does:
image: ...:0.10.0— pinned to a specific release. No surprise updates.restart: unless-stopped— The container restarts automatically after a reboot or crash, unless you deliberately stop it. This is what makes Hermes 24/7.env_file— loadsHERMES_AUTH_TOKEN,OPENROUTER_API_KEY, andTELEGRAM_BOT_TOKENfrom the secrets file. Keys never appear in this file.volumes— mounts your VPS directory into the container’s data path. This is what makes memory, skills, and pairings persistent.ports— binds the gateway only to your Tailscale IP. Nothing listens on the public interface.logging— caps Docker logs at 30 MB total (3 files of 10 MB each, auto-rotated) so they cannot fill your disk.
Save (Ctrl+O, Enter, Ctrl+X).
Warning:0.10.0is shown as an example tag. Before deploying, check the upstream releases page at github.com/NousResearch/hermes-agent and pin the current stable tag. Using:latestworks for a quick test but is not recommended for a server you rely on.
Phase 10: Start the Gateway
Step 10.1 - Pull and start
# Run on your VPS
cd /opt/hermes
docker compose pull
docker compose up -d
dmeans detached mode, the container runs in the background. You can close your terminal, and Hermes keeps running.
Step 10.2 - Verify it started
# Run on your VPS
docker ps
Look for hermes-agent with status Up. If it shows Exited, read the logs:
# Run on your VPS
docker compose logs
The most common causes:
- YAML syntax error in
config.yaml(tabs instead of spaces, or inconsistent indentation) - Wrong or missing key in
.env(A trailing space or newline can cause this.) - Port already in use (another process is listening on 8642)
Fix the issue, then run docker compose up -d again.
Step 10.3 - Confirm the gateway is listening
# Run on your VPS
curl -s http://YOUR_TAILSCALE_IP:8642/health
A response confirms the gateway is running. No response means it is not listening on that address — check bindAddressin config.yaml and the ports line in docker-compose.yml Both match your Tailscale IP exactly.
Step 10.4 - Verify port binding is correct
What: Confirming the web UI is bound to the Tailscale IP only.
Why: If the Tailscale IP placeholder was not replaced correctly, Docker may bind port 8642 to all interfaces (0.0.0.0), making the UI publicly accessible.
# Run on your VPS
sudo ss -tlnp | grep 8642
The output should show your Tailscale IP:
LISTEN 0 ... 100.x.x.x:8642 ...
Warning: If the output shows0.0.0.0:8642or*:8642instead, the web UI is publicly exposed. Stop immediately. Opendocker-compose.yml, confirmYOUR_TAILSCALE_IPwas replaced with your actual100.x.x.xaddress, then rundocker compose down && docker compose up -dand re-check.
Step 10.5 - Access the web UI from your Mac
Open a browser on your Mac (with Tailscale running) and navigate to:
http://YOUR_TAILSCALE_IP:8642
You should see the Hermes web UI. When prompted, authenticate with the HERMES_AUTH_TOKEN one you generated in Phase 5.
Note: This works from your phone too. Open the Tailscale app to confirm it is connected, then open your mobile browser to the same address.
Phase 11: First-Run Setup
What: Completing Hermes’ first-time setup through the web UI.
Why: On first launch, Hermes walks you through confirming your model provider, choosing a terminal backend (this is a security decision see below), and initialising its memory subsystem. After this, the learning loop is active: Hermes begins building and refining skills based on how you use it.
Step 11.1 - Confirm provider and model
In the web UI setup flow, confirm that the provider is OpenRouter and the model matches the slug you set in config.yaml. If you skipped the manual config.yaml, set them here now.
Step 11.2 - Choose your terminal backend
Hermes asks which terminal backend to use for shell and file operations. This is the single most important security choice in the whole setup.
- Docker (recommended) — confines shell and file operations to a container. If a skill or the model does something unwise, the blast radius is contained.
- Local — runs operations directly on the host with no isolation. Fast, but the agent effectively has the keys to the kitchen.
- Other options (SSH, Daytona, Singularity, and Modal) target more advanced or remote-execution use cases.
Warning: Choose Docker unless you have a specific reason not to. Hermes’ own security philosophy states plainly that the only real boundary against an adversarial LLM is the operating system or container — not the agent’s own guardrails. Picking local here is the difference between “agent in a sandbox” and “agent with unrestricted host access.”Step 11.3 - Verify persistence worked
After setup completes, confirm the files landed on the VPS disk (not just inside the container):
# Run on your VPS
ls /opt/hermes/data/
You should see config.yaml, and directories like credentials/, memory/, and logs/. If the directory is nearly empty, the volume mount did not work — re-check the volumes line in docker-compose.yml against Phase 4.
Step 11.4 - Persistence test
Restart the container and confirm the agent keeps its state:
# Run on your VPS
docker compose down && docker compose up -d
Reopen the web UI. It should not ask you to redo the first-run setup. If it does, the volume mount is not persisting. Run Step 11.3 again and confirm the files are present on disk.

Phase 12: Apply Security Hardening
Hermes is powerful; it can run terminal commands, read and write files, and make network requests. Nous Research is unusually candid about what that means: the only security boundary against an adversarial LLM is the operating system. Everything Hermes ships on top of that approval gates, output redaction, the Skills Guard injection scanner is accident prevention, not containment. Containment comes from the terminal backend choice (Phase 11) and the network isolation (Phases 2–3) you have already applied.
This phase confirms that the software-level guardrails are in place.
# Run on your VPS
sudo nano /opt/hermes/data/config.yaml
Ensure the following are set:
security:
  # Pause for explicit approval before consequential actions
approvalRequired:
- shell_exec
- file_write
- external_api_calls
  # Redact secret-looking patterns from model-visible output
outputRedaction:true
  # Scan skills for prompt-injection before they run
skillsGuard:true

gateway:
bindAddress:"YOUR_TAILSCALE_IP:8642"
rateLimit:
enabled:true

channels:
telegram:
dmPolicy:"pairing"
What each setting does:
approvalRequired— Before the agent runs shell commands, writes files, or makes external API calls, it shows you what it is about to do and waits for your approval. The principle of least autonomy: you are in the loop before anything with side effects happens.outputRedaction— masks secret-looking patterns (keys, tokens) in output, reducing the chance of a credential leaking into a log or a chat message.skillsGuard— scans skills for prompt-injection content before they execute. A skill that tries to smuggle instructions to the model gets flagged.gateway.bindAddress— locks the UI to your Tailscale IP. Defense in depth alongside UFW.rateLimit.enabled— if the agent enters a loop, rate limiting prevents it from hammering OpenRouter and burning your credit indefinitely.channels.telegram.dmPolicy: "pairing"— Only paired accounts can command the bot.
Apply and restart:
# Run on your VPS
docker compose down && docker compose up -d
Note: Always usedocker compose down && docker compose up -dwhen applying config changes. A simplerestartdoes not always force the container to re-read the mounted config.
Note: The exact key names above reflect Hermes’ documented security features. If your pinned version reports an unknown-key error in docker compose logs, check the README for your version at github.com/NousResearch/hermes-agent — feature names occasionally shift between releases. Comment out any key your version does not recognise and restart.Phase 13: Connect Telegram
📖 What: Linking your personal Telegram account to your Hermes agent. 💡 Why: With dmPolicy: "pairing", the bot ignores DMs from everyone — including you — until pairing is complete. Pairing creates a verified link between your Telegram account and the agent, so only you (and anyone you explicitly pair) can command it.Step 13.1 - Initiate pairing from the web UI
In the Hermes web UI, go to the Channels (or Integrations) section and select Telegram. Because your TELEGRAM_BOT_TOKEN is already in .env, Hermes connects to BotFather’s API and presents a pairing flow — typically a code or a one-time link.
Step 13.2 - Complete pairing in Telegram
Open Telegram, find your bot (search for the username from Phase 8), and start a chat. Send the pairing code shown in the web UI, or follow the pairing prompt. Once accepted, your account is linked.
Note: Hermes ships ahermesCLI inside the container for management tasks. If the web UI pairing is unavailable in your version, you can run CLI commands withdocker exec -it hermes-agent hermes --helpto see the pairing subcommands your version supports. Pairing approaches differ slightly between releases, so let the help output be your source of truth rather than a memorised command.
Step 13.3 - Test from Telegram
Send your bot:
Hello — who are you and what can you help me with?
Your agent should respond. If it does not respond within 30 seconds:
docker ps— confirm the container is running (not Exited)- Confirm the bot token in
.envis correct (copy-paste from BotFather, no trailing spaces) - Confirm
dmPolicy: "pairing"is set and pairing completed - Check
docker compose logsfor connection errors
Phase 14: Set Behavioral and Financial Guardrails
What: Setting limits on how the agent behaves and how much it can spend.
Why: An agent running 24/7 with shell access can, if unconstrained, enter loops, make hundreds of API calls, or act faster than you can monitor. These guardrails give it sensible defaults while you learn how it works. You can loosen them later.
Step 14.1 - Review your OpenRouter spend
Go to openrouter.ai → Credits / Activity and confirm the spend on your hermes-hostinger-vps key. After first-run setup you will have used a small amount. Confirm the per-key credit limit you set in Phase 6 is active, and set a low-balance alert.
Step 14.2 - Set behavioral limits in chat
In the web UI or via Telegram, send your agent these instructions. The learning loop stores them as persistent context:
When a task fails three times in a row, stop and tell me. Do not retry indefinitely.
Limit any background task to 10 minutes unless I explicitly say otherwise.
Before sending any message on my behalf, draft it and get my approval first.
Always ask before deleting any file.
Step 14.3 - Final end-to-end verification
Send your agent via Telegram:
What time is it on the server right now, and can you confirm which model you're running and what you remember about our setup?
A correct, contextual response confirms all four layers are working:
- Telegram → gateway connection is live
- OpenRouter is responding (and you can see which model)
- Memory persisted from the first-run setup across the restart
- The agent is operating within its guardrails
If you get a generic response with no context, the volume mount is not persisting — re-check Phase 4 and Phase 11.

Appendix A: Updating Hermes
What: Installing a newer version of Hermes.
Why: Hermes ships frequent updates with new features and security fixes. Because you pinned the image, nothing changes until you decide to. Your data is safe through upgrades because it lives on the VPS disk, not inside the container.
# Run on your VPS
cd /opt/hermes

# 1. Back up your data first (see Appendix B)
# 2. Edit docker-compose.yml and update the image tag
sudo nano docker-compose.yml
# Change:  image: ghcr.io/nousresearch/hermes-agent:0.10.0
# To:      image: ghcr.io/nousresearch/hermes-agent:NEW_VERSION

# 3. Pull the new image
docker compose pull

# 4. Restart with the new image
docker compose down && docker compose up -d

# 5. Verify and confirm data is intact
docker ps
ls /opt/hermes/data/
Your agent’s memory, skills, and pairings are untouched. The upgrade swaps only the application code.
Note: If you are migrating from an existing OpenClaw install, Hermes ships ahermes claw migratetool that imports OpenClaw config, memory, skills, and environment variables. Rundocker exec -it hermes-agent hermes claw migrate --helpto see options. Not everything transfers perfectly — some OpenClaw skill formats need manual adjustment — but the core migration is automated.
Appendix B: Log Management
💡 Why: Theloggingblock indocker-compose.ymlcaps Docker logs at 30 MB. But Hermes also writes its own logs to/opt/hermes/data/logs/. These grow over time. Review periodically and archive or delete old logs if disk space gets tight.
Check current disk usage:
# Run on your VPS
df -h /
du -sh /opt/hermes/data/
du -sh /opt/hermes/data/logs/
Back up the full data directory before any upgrade:
# Run on your VPS
sudo tar czf ~/hermes-backup-$(date +%Y%m%d).tar.gz -C /opt/hermes/data .
Older log files in logs/ are audit records, not operational data — the agent does not need them to function, so they are safe to delete if space is a concern.
Appendix C: Emergency Recovery (Hostinger Browser Console)
If you lose Tailscale connectivity, misconfigure UFW, or are otherwise locked out, Hostinger’s browser console connects directly to your server over the datacenter’s internal network, bypassing all network configuration.
How to access:
- Log into hPanel
- Navigate to VPS → your server → Console (or Emergency Console)
- A terminal opens in your browser
From here you can:
- Restart Tailscale:
sudo systemctl restart tailscaled - Check UFW rules:
sudo ufw status - Temporarily disable the firewall to regain access:
sudo ufw disable - Fix configuration errors in any file
- Restart the container:
cd /opt/hermes && docker compose down && docker compose up -d
Note: You bookmarked this in Phase 1. During an incident you want to go straight there. If you have not bookmarked it yet, do it now.
Appendix D: Quick Reference Cheat Sheet
Fill this in and store it securely (your password manager is the right place):
| Value | Where to find it | Your value |
|---|---|---|
| VPS IP (public) | Hostinger email / hPanel | |
| VPS Tailscale IP | tailscale ip -4 on VPS | |
| SSH username | Phase 3 | |
| Hermes auth token | You generated it (Phase 5) | |
| OpenRouter key name | hermes-hostinger-vps | |
| Active model slug | openrouter.ai/models | |
| Telegram bot username | BotFather message | |
| Web UI URL | http://YOUR_TAILSCALE_IP:8642 | |
| Data directory | /opt/hermes/data/ | |
| Secrets file | /etc/hermes/.env | |
| Config file | /opt/hermes/data/config.yaml | |
| Compose file | /opt/hermes/docker-compose.yml | |
| Hostinger console | hPanel → VPS → Console |
Appendix E: Common Problems
“Tailscale SSH won’t connect from my local machine.”
Check both devices appear in login.tailscale.com as Connected, then:
# Run on your LOCAL machine
sudo tailscale status
tailscale ping YOUR_VPS_TAILSCALE_IP
If the VPS shows offline, log in via the Hostinger browser console and run sudo systemctl restart tailscaled.
“The container keeps exiting.”
# Run on your VPS
cd /opt/hermes && docker compose logs
Most common causes:
- YAML indentation error in
config.yaml- Use spaces, never tabs - Missing or incorrect value in
.env- check for trailing spaces or newlines - An unrecognized config key for your pinned version - check the README for your version and comment the key out
“The web UI loads but won’t accept my auth token.”
Confirm HERMES_AUTH_TOKEN in /etc/hermes/.env Exactly matches what you are typing — no trailing newline, no quotes accidentally included. After editing .env, you must docker compose down && docker compose up -d for the container to re-read it.
“Agent has no memory after restart.”
The volume mount is not working. Inspect the container’s mounts:
# Run on your VPS
docker inspect hermes-agent | grep -A 20 "Mounts"
Confirm /home/node/.hermes is mapped to /opt/hermes/data. If not, re-check the volumes section in docker-compose.yml and run docker compose down && docker compose up -d.
“My OpenRouter calls fail with an auth or model error.”
- Auth error: confirm the key in
.envstarts withsk-or-v1-and has no trailing characters; confirm the key has credit and its per-key limit is not exhausted. - Model error: confirm the slug in
config.yamlis a current, exact slug from openrouter.ai/models. A model that was renamed or retired returns an error.
“Telegram bot is not responding.”
docker ps— confirm the container is running- Confirm the bot token in
.envis correct (copy-paste from BotFather, no spaces) - Confirm
dmPolicy: "pairing"is set and pairing is complete - Check
docker compose logsfor Telegram connection errors
Appendix F: Now What?
Your Hermes agent is running, secured, and persistent. A few things to try first:
1. Let the learning loop start working
Summarise what you know about me so far, and tell me what kinds of tasks you can help with.
2. Install a skill
What skills do I have available, and how do I install one from the Skills Hub?
Hermes installs skills via its hermes skills CLI from the public Skills Hub or from local directories — a different ecosystem from OpenClaw’s ClawHub.
3. Give it a recurring task
Every morning, give me a short briefing on my calendar and anything urgent.
4. Test the confirmation guardrails
Delete the file /tmp/test.txt
The agent should ask for your confirmation before acting. If it acts immediately without asking, re-check approvalRequired in Phase 12.
5. Try swapping models
Edit the model slug in config.yaml, restart, and compare a cheap model against a frontier one on the same task. This is the whole point of routing through OpenRouter — the cost-to-capability dial is in your hands.